
This is just a quick 'how to' on making a header! These steps will show you how I made mine and hopefully you can pick up from that :-)

STEP ONE: Go on your blog, click 'template' from the bar at the side, and then click 'customise'


STEP TWO: Click on 'Adjust widths' to see what the size of your header may roughly need to be.

STEP 3: Go to a photo editing site, I found picmonkey to be the easiest

STEP 4: Upload any photo, literally it does not matter what one, just pick a random one from your pictures.

STEP 5: Click on the resize option and the bottom, and untick the "keep proportions" box

STEP 6: Change the numbers to the size you want your header to be. My blog is 1180 pixels wide, and I just guessed the height of how I wanted it. Make sure you apply your changes!

STEP 7: Next, click on the overlay tab, click on 'geometric' and choose the basic rectangle.

STEP 8: Drag the rectangle so it covers your picture, and change it to the colour white (if your blog background is white, if not try and change it to the same colour) and then click merge so it doesn't move about.

STEP 9: Click on the P button, which goes to the texts, choose the type of text you want and click on the "add text" button. I chose the "shadows into light two" writing as I loved it!
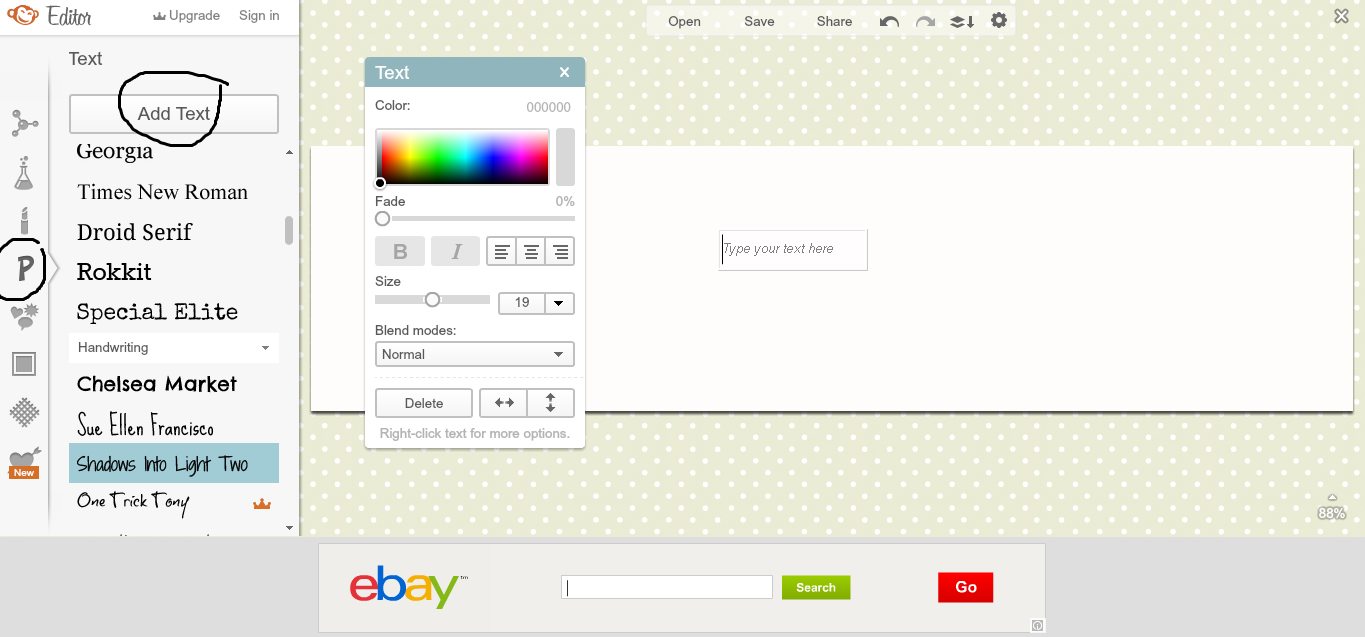
STEP 10: Type out what you want the name of your blog to be, and decide on the size, colour, where you want it placed and etc. Click merge again once you've done. If you want a slogan or something then add another text and do the same thing, click merge again.

The rest of this is completely optional, I'm just showing you what I've done to mine!
I then clicked back on overlays, and decided I wanted some doodly hearts, so I clicked on that tab.

I decided on the heart I wanted and placed it in the position I wanted it in and clicked on merge again, I saved it to my computer and voila, you have your header!


I also created my background similarly to this, but I hope this helps you create your header if you weren't sure on how to make one. This is only a simple one as I find making elaborate ones very hard, so I stuck with this. I hope I've helped, if you want to know how to add it do your blog, or if you want any other tutorials on things related to your blog then comment down below!
(P.S. Have you entered my giveaway yet? You can win Maybelline fit me foundation, concealer and setting powder! I ship worldwide too, see the post before last for more info on how to enter)

4 comments
Very helpful post, loved it! :)
ReplyDeleteInês xxx
glad I helped:)xx
DeleteI will give this a try this afternoon and let you know how it went. Thanks for sharing :)
ReplyDeleteThis is a great tutorial and I'm sure I'll use it when I update my header!
ReplyDeleteJemima x
http://anotherrantingreader.blogspot.co.uk